
Free Capybara Knitting Pattern - A Small Toy Perfect for Scrap Yarn
- Jan 9
- 4 min read
Updated: Jan 28

Looking for a free knitting pattern for a small stuffed animal that’s both fun and engaging? This Capybara knitting pattern is an intermediate-level project that uses short row techniques to create soft shaping and a smooth, rounded body.
Knit in the round and designed to be small and efficient, this free capybara toy knitting pattern is ideal for using leftover yarn. It’s a fast, satisfying knit for makers who are comfortable with basic toy construction and want to explore short rows in a playful, manageable way. The finished capybara makes a charming handmade toy or a cozy piece of knit home décor.
Skill Level
Intermediate
Techniques
Long tail cast-on
Toe-up cast-on link
Knit in the round
German short rows
Increase and decrease stitches
Finished Size
8 cm / 3 in
Needles
US 2 (3.00 mm) Double-pointed needles or circular needles
Gauge
28 sts x 35 rows = 4 x 4 in / 10 x 10 cm
Notions
A tapestry needle
Yarn
Drops Baby Merino Wool - 100% Wool (50 g/ 175 m/ 191 yds)
Yarn Amount
Color A (main body): 6 g
Color B: 2 g
Other Materials
Toy stuffing and/or a bean bag
Black yarn or embroidery floss for the face
(Optional) Yarn for the scarf
Abbreviations
CO | cast on | k2tog | knit 2 stitches together |
rnd(s) | round(s) | ssk | slip, slip, and knit |
st(s) | stitch(es) | k | knit |
RS | right side | p | purl |
WS | wrong side | RLI | right-lifted increase |
DS | double stitch | LLI | left-lifted increase |
kDS | knit double stitch | m1L | make 1 left increase |
pDS | purl double stitch | m1R | make 1 right increase |
Note
For Color B, since I didn’t have scrap yarn in a matching color, I substituted it with DROPS Alpaca yarn and used US 1 (2.50 mm) needles.
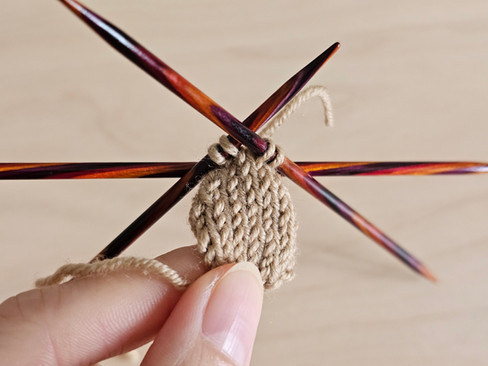
Free Capybara Knitting Pattern - Body
You will start knitting in the round from the nose down to the bottom of the body. To shape the neck curve, you will use German short rows.
(Color B) Toe-up CO 12.
Rnd 1: knit
Rnd 2: (k1, LLI, k4, RLI, k1) x 2 times (16 sts)
Rnd 3: knit
Rnd 4: (k2, LLI, k4, RLI, k2) x 2 times (20 sts)
Rnd 5: knit
Rnd 6: (k3, LLI, k4, RLI, k3) x 2 times (24 sts)
Rnd 7-8: change to color 1, k 2 rnds
Rnd 9: (k4, LLI, k4, RLI, k4) x 2 times (28 sts)
Rnd 10-11: k 2 rnds
Rnd 12: (k5, LLI, k4, RLI, k5) x 2 times (32 sts)
Rnd 13-14: k 2 rnds

Short Rows
Row 1: k7, turn
Row 2: DS, p29, turn
Row 3: DS, k27, turn
Row 4: DS, p25, turn
Row 5: DS, k23, turn
Row 6: DS, p21, turn
Row 7: DS, k6, ssk, k4, k2tog, k5, turn
Row 8: DS, p15, turn
Row 9: DS, k3, ssk, k4, k2tog, k2, turn
Row 10: DS, p9, turn
Row 11: DS, ssk, k4, k2tog, kDS, k1, turn
Row 12: DS, p7, pDS, p1, turn
Row 13: DS, ssk, k4, k2tog, kDS,kDS, m1L, k1, turn
Row 14: DS, p9, pDS, pDS, m1R, p1, turn
Row 15: DS, k12, kDS, kDS, m1L, k1, turn
Row 16: DS, p15, pDS, pDS, m1R, p1, turn
Row 17: DS, k18, kDS, kDS, m1L, k1, turn
Row 18: DS, p21, pDS, pDS, m1R, p1, turn
Row 19: DS, k24, kDS, kDS, m1L, k1, turn
Row 20: DS, p27, pDS, pDS, m1R, p1, turn
Row 21: DS, k30, kDS

Start knitting in a round.
Body
Rnd 1: kDS, k31
Rnd 2: (k8, m1L), repeat () to the end (36 sts)
Rnd 3-11: k 9 rnds
Rnd 12:(k2tog, k4), repeat () to the end (30 sts)
Rnd 13-15: k 3 rnds
Rnd 16: (k2tog, k3), repeat () to the end (24 sts)
Rnd 17: knit, and stuff the head.
Rnd 18: k2tog for all sts (12 sts)
Rnd 19: knit
Stuff more and gather bind-off.


Arms
(Color A) Long tail CO6, knit flat.
Row 1(WS): purl
Row 2(RS): k2, LLI, k2, RLI, k2 (8 sts)
Row 3: purl
Row 4: k8, CO6, join in a round (14 sts)
Rnd 5-6: k 2 rnds
Rnd 7: k2tog, k4, ssk, k2tog, k2, ssk (10 sts)
Rnd 8: knit
Rnd 9: k2tog, k2, ssk, k2tog, ssk (6 sts)
Rnd 10: knit
Rnd 11-13: change to color B, k 3 rnds
Gather bind-off. Make two of them.


Feet
(Color B) Long tail CO6, knit 3 rnds. Gather bind-off. Make two of them.

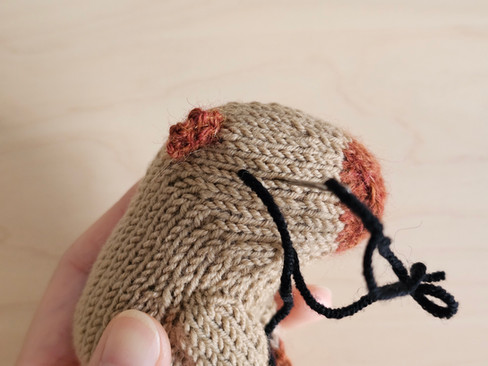
Ears
(Color B) Long tail CO6, knit flat.
Row 1(WS): knit
Row 2(RS): k2tog, k4 (5 sts)
Row 3: k2tog, k3 (4 sts)
Row 4: k2tog, k2 (3 sts)
Gather bind-off. Make two of them.

Finishing
First, position both ears on the head. Pin them in place to find the perfect position, then sew them on. Next, sew the arms to the sides of the body along the edge. Attach the two feet at the bottom of the body.


Tip: Always pin the parts onto the body before sewing to check for symmetry.
Finally, use black yarn or embroidery floss to embroider the face: make two simple horizontal lines for the eyes and a Y-shape for the nose. Weave in all loose ends inside the body to secure them.


I used orange yarn, wrapped it a few times, and tied a knot to mimic a scarf.


Voila~ Have fun finishing your capybara, and don’t forget to make it your own with little details and scrap yarn touches ;)


Comments