
🎃 DIY Pumpkin Button: The Perfect Autumn Touch for Your Knits
- Oct 13, 2025
- 3 min read
Updated: Oct 16, 2025

Fall is my favorite season to add a little handmade charm to my knitting projects. This year, I decided to make my DIY pumpkin buttons to match the cozy autumn theme — and they turned out so cute! 🍂🎃
These tiny pumpkins are made with oven-bake clay, which makes them sturdy, lightweight, and full of character. You can easily customize their size and color to fit your knitted toys, cardigans, or accessories. In this post, I’ll show you step-by-step how to create your own pumpkin buttons — a small detail that instantly adds a festive, handmade touch to any knit project.
Materials & Tools
Oven-bake clay (any brand) in orange and green
Toothpick or needle
Working mat
Baking sheet lined with parchment paper
Preparation
Before you start shaping your pumpkins, make sure to set up a clean workspace. Using a working mat is especially important — oven-bake clay can leave stains or residue on your table surface. The mat will protect your workspace and make cleanup much easier later on.
DIY Pumpkin Button
Step 1: Shape the Pumpkin Segments
Take a small amount of orange clay — just enough to make one button. Roll the clay into four small balls, then gently shape each one into a short cylindrical piece.
These pieces will become the pumpkin’s segments, giving it that cute, rounded look once they’re combined.


Step 2: Form the Pumpkin Shape
Take two of the clay pieces and gently press them together so they stick. Use your fingers to smooth and round the top and bottom a little — this helps the pumpkin start taking shape.
Next, attach one more piece on each side, pressing gently and shaping again. You should now have a round pumpkin form made of four segments joined together.


Step 3: Blend the Segments
Using a toothpick (or needle), gently roll it across the top and bottom of the pumpkin. This will help merge the segments together smoothly while keeping that natural, ribbed pumpkin look.
Take your time — gentle pressure works best to keep the shape nice and round.


Step 4: Add the Stem
Take a small piece of green clay and roll it into a tiny stem shape. Place it on the top center of the pumpkin, then use your toothpick to gently roll around the edge of the stem so it attaches securely.
You can slightly bend or twist the stem to give your pumpkin a bit of personality — each one will look charmingly unique!


Step 5: Make the Button Holes
Use your toothpick to poke two holes in the center of the pumpkin. Make sure the toothpick goes all the way through — this ensures the holes are large enough for your yarn or sewing needle later on.
Try to keep the holes evenly spaced so the button sits nicely when attached to your knitted project.


Step 6: Bake the Buttons
Place your pumpkin buttons on a baking sheet lined with parchment paper. Bake them according to the instructions on your clay’s packaging — for mine, 15 minutes was perfect.
Once baked, let them cool completely before handling, as they can be quite hot right out of the oven.
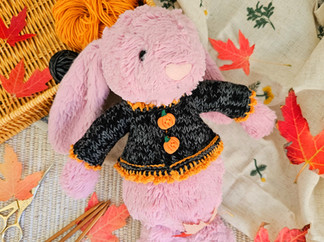
Now your adorable pumpkin buttons are ready to use! 🎃 They make the sweetest autumn touch for any knitted toy, cardigan, or accessory.


See Them in Action
I used mine on a Jellycat Halloween Cardigan, and they add such a charming, handmade touch. The little pumpkins instantly make the piece feel cozy and festive — perfect for autumn or any time you want a hint of fall in your knits.
You can mix and match sizes or colors, or even make a set for toys, sweaters, or home decor. Every button becomes a tiny piece of art, making your knitted creation truly unique.


Comments